One of my biggest joys is teaching the tips and tricks of Photoshop to people who are newer to the system (or not as new but struggling with something) and to watch their eyes light up when they finally have that "Ah-ha!" moment and learn how to do something they've been struggling to understand and master. It's almost like teaching someone a magic trick and is so fulfilling!A lot of times people will ask me how I achieve a certain look to my photos in post-production. "How do you make the eyes "pop"?" "How do you create soft skin?" "How do you whiten teeth?" "How do you make your photo look vintage?" "How do you swap heads?" "How do you....?"
Because I always love sharing this information with others who ask me about it, I'm going to be posting some Photoshop tricks here on my blog in the coming weeks. I want you to be able to apply them to your own photos and get that "wow" look that you're going for. : )
So, my first tip will be how to make eyes "pop" in your pictures.
STEP #1:
The first step is to find a picture of someone that has some pretty good catch-light in their eyes.
By this, I mean the little white light hitting their eyes. You need a fairly good exposure on the eyes when you take your photo to make them look their best when you enhance them.
STEP #2:
The second step is to open your photo up in Photoshop. I work with CS4 on a regular PC, so I will be writing the commands from that system. There might be slight variations if you are working in CS5 or an older system of Photshop, such as CS3 OR if you are working on a MAC.
STEP #3:
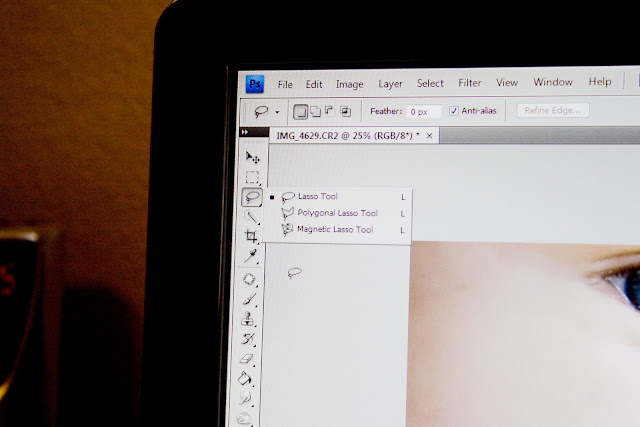
Locate your lasso tool.

Use it to trace around one eye. (It doesn't need to be perfect). Now, hold down your SHIFT key and use the lasso tool to trace around the other eye (again, it doesn't need to be perfect). It sometimes helps to zoom in on a picture so that you're isolating the eye area and can see them up close when you're tracing them.
STEP #4:
When both eyes have been traced around, you'll seeing little "dancing lines" moving around the selection you've made. Right click with your mouse and you'll see a menu come up. From the menu, look down the list and choose the option that says, "Feather."
STEP #5:
When the feather dialog box opens up, set your feather radius to about 10.
STEP #6:
Next, go to Filter, then Sharpen, then Unsharp Mask (or you can create and use a shortcut on your keyboard. I created a shortcut because I use unsharp mask a LOT. If you don't know how to create a shortcut, write to me and I'll let you know how).
(Tip: Have "preview" selected so that you can see the transformation. Make sure you don't OVER sharpen or you'll get some pretty creepy looking eyes). ; )
Keep your threshold kept to zero. When you get it to the desired levels, click OK and you're finished!
Then you get to see the fun before and after of how the eyes in your picture have suddenly "popped" and look sharp and sparkly. Try it out for yourself and have fun! : )
Write to me and let me know if there is something you'd like to see broken down into steps on here and I'll choose some to blog!


You are my hero! Seriously - I'm the luckiest girl to have you in my life...as a friend & photo mentor! : ) : )
ReplyDeleteThank you thank you. I didn't know this was possible with PSE8 but it is. I would love to upgrade my PS but can not afford it. Is it possible to make skin so perfect and milky white like the children in your pictures or is it just lighting? I would love to see how you do it. Thank you again! Christina
ReplyDeleteTerrific! I'm glad that the information in my blog was able to help you out! : ) If you would like to try Photoshop CS5 for free, you can download the month long trial version from Adobe (http://www.adobe.com) and try it out. I did that with both my Photoshop and Lightroom systems before committing to purchase them. The hard part is resisting them once you try them! ; )
ReplyDeleteI will definitely be covering the question that you had about how to make sking "perfect." It's actually a pretty easy trick and one you should be able to do in PSE8 too. Stay posted! : )
Thank you, beautiful work!!!!
ReplyDeleteWow that's pretty Cool! Thanks you so much for sharing with us :)
ReplyDeleteYou are welcome, both of you! Thank you so much for visiting my blog : )
ReplyDeleteWOW I can't believe you'r sharing your secrets! Thank you so much, noone wants to share anything so it's really hard to find it on your own. Thank you so much this is soooooooo helpful!!!
ReplyDeleteOh and have you any more photoshop secrets;) I'm just getting into photography and finding amazing help like this is rare!!! Thanks again xx
DeleteGreat tutorial! You wrote this 4+ years ago and worked well today with my CS5. Anything different you do different today compared to nearly five years ago?
ReplyDelete